
2014 Margaret Bremner; enthusiasticartist.blogspot.com")
Cubine is one of many 'official' Zentangle patterns. Maria Thomas' drawing steps for Cubine are here, as well as a photo of the inlaid wood that inspired it.
SHADING
With most tangles you can be rather easy-going with the shading, but there are a few where you want to stay in the lines. Cubine is one of those. Take care shading.
And then some #1 - SCALE
I generally make the small black square about one quarter of the original large square. One of the simplest ways to vary the look of Cubine is to change the size of the small square, the black 'hole'. You can see the difference below: medium holes, small holes, and large holes.
2014 Margaret Bremner; enthusiasticartist.blogspot.com")
2014 Margaret Bremner; enthusiasticartist.blogspot.com")
2014 Margaret Bremner; enthusiasticartist.blogspot.com")
And then some #2 - ANGLES
Try drawing your grid so that one set of lines is closer together at one end than at the other, and the pattern seems to be nearer and farther.

Something I really like to do with Cubine is to add an extra corner. It gives the whole pattern a 'front'. Simply add a corner before continuing with Cubine as usual.


.jpg "(c)2014 Margaret Bremner; enthusiasticartist.blogspot.com") |
| Cubine monotangle, some with added 'fronts'. |

And then some #4 - CURVY LINES
As with almost any square grid pattern, you can use curvy lines rather than straight ones. You can do straight diagonal lines in each square, but I prefer to curve the diagonal line a little according to the shape of the square. In this case, know that the diagonal lines will not be straight lines through all the squares. On occasion they may be almost frighteningly angled!
Here's a curvy square grid, the same grid with diagonal lines, and finished with Cubine.
2014 Margaret Bremner; enthusiasticartist.blogspot.com")
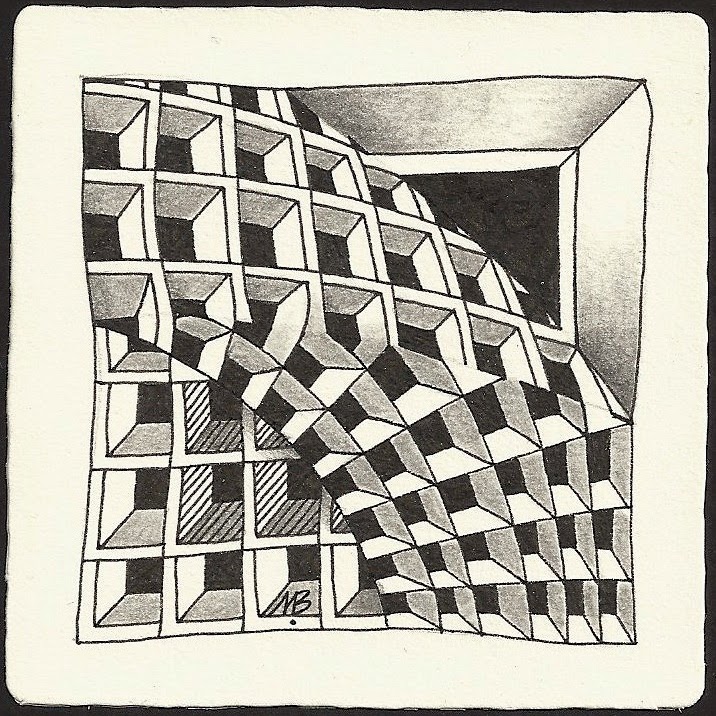
And then some #5 - ALIGNMENT
One thing I've discovered with Cubine to make it look "right", especially if using curvy lines, is to make the sides of the black square line up with the sides of the larger, original square. The small black square should have almost the same shape as the larger square.


2014 Margaret Bremner; enthusiasticartist.blogspot.com") |
| Cubine with added 'fronts', with curvy lines, and windows on the stars, plus a free-floating Cubine: a hole through the white space - what fun! |
Cubine can be done in a circle. I've added a 'front' to these, but you wouldn't need to. The template for this design is CZT Erin Olson's Zendala Dare #31, which you can find here.
2014 Margaret Bremner; enthusiasticartist.blogspot.com")
And then some #7 - TRIANGLES
Cubine can also be done in triangles, although it's hardly CUBE-ine at that point, is it? Here it is in a sort of Tripoli-style arrangement. Tripoli begins with a series of (more-or-less) equilateral triangles. This is a similar process to the 'uninterupted front' using squares, shown above in #3. The trick is to keep the 'holes' on the same side of each triangle; takes a little bit of thinking.
2014 Margaret Bremner; enthusiasticartist.blogspot.com")
%2Bcopy.jpg "(c)2014 Margaret Bremner; enthusiasticartist.blogspot.com")
Finally, a give-away!
I'm giving away the four square tiles shown in this post. I'm also going to abandon my salad bowl and bits of paper in favor of digital technology, and use Rafflecopter for this process (*gasp*). Ta-da! I'm growing up! :)
There will be four winners, each of whom will win one of the four tiles featuring Cubine. The contest runs from midnight January 1 until midnight January 8. For those like me who are occasionally confused by such things, this means that anytime on January 8 is too late. The contest runs from January 1-7 inclusive.
There are two ways to enter:
1) Leave a comment on this blog post.
2) Tell me 1-3 other tangles that you'd like to see a similar post about. You can see my "and then some" tutorials on other tangles here: Paradox, Knightsbridge, Cadent, and Munchin, so don't include those. ;)
I think this means that if you do both options you get two entries. No guarantees. Good luck!
a Rafflecopter giveaway
Happy New Year, Margaret! Awesome post!!!! All the best to you in 2015!
ReplyDeleteGreat tutorial Margret. Happy new year, may all your wishes come true. Love the aproach to the tangles this way. I only know about the cadent post because Rick and Maria brought it under our attention on 12th CZT seminar. So I rush now to the others!
ReplyDeleteWhat an amazing post Margaret! This is certainly one to keep referring back to, which is what I do with your post and variations on cadent in July 2013. If lucky enough to win, I would love any of the tiles above. They are all wowzers. As for a future post, I would like to see one with Munchin please.
ReplyDeleteWhoops, just realised you have done a Munchin tutorial - off to look now.
DeleteGenius! Love these tutorials!
ReplyDeleteAs always you stretch my tangling mind with your "and then some" Tangle ON! and Happy New Year too
ReplyDeleteBette Abdu
Thank you for taking the time to do these tutorials! They are such a help. I'd like to see Cockles n Mussels in a tutorial. Any tips for making the grid more eye-appealing? How should it be shaded? Wishing you happiness in 2015!
ReplyDeleteAll the best for 2015! This cubine tutorial is great! How about some beautiful Mooka?
ReplyDeleteI love the way your mind works! I would love to see how far you can take the tangles aurak
ReplyDeletenot and schway
Margaret, you have inspired me to use cubine. Happy tangling to you in 2015.
ReplyDeleteI might enjoy cubine now!!
ReplyDeleteHappy 2015! Wishing everyone good health.....if you have good health you can deal with everything else! ;0)
ReplyDeleteI would like to see a tutorial on Chaining/punzel
ReplyDeleteWow, this is so inspirational and wonderful! Thank you Margaret, and best wishes for a happy and healthy New Year! (I'd love to see the same thing done for Tripoli).
ReplyDeleteYour work is amazing. I always savor your And Then Some posts as you always give ideas I would never think about. Thank you and happy 2015.
ReplyDeletehahaha! i love to read your posts! i'm going to miss that salad bowl ;) thanks for the great and then somes - you have such great insight to the patterns. i appreciate you sharing that with us who are less creative. that would be me. happy new year, margaret! i hope 2015 is wonderful for you!
ReplyDeleteas for which of the 4 tiles i'd like to have - sheesh! i'll take anything you are willing to part with :)
ReplyDeleteHappy New Year! Thanks so much for the many variations of Cubine, Margaret!
ReplyDeleteI'd love to see your take on Chainging, Daggerly, and Sh'rock.
ReplyDeleteHappy, Happy New Year Margaret! Thanks for being such an AWESOME artist and teacher! My students (and me too!) always struggle with "Tripoli". Once one has the basic tripoli, I'm sure there is sooo much more!
ReplyDeleteUltra newbie who's thrilled to have discovered your blog. (Considering the season) can't believe I'm wishing the Twin Cities were a little closer to Saskatchewan; I want to take classes with you! I'd like to support you by buying supplies through you, though. Any issues with shipping to the US?
ReplyDeleteRhea, I can certainly ship to the US, but they'd be crossing the border twice, with attendant costs. Best would be to find a CZT near you, or order directly from Zentangle. Thanks for the thought though! :)
DeleteI figured. Can't find any CZTs in the Twin Cities at all :-(. Thank Goodnessvfor generous bloggers like yourself!
DeleteHi Margaret, Happy new year. Incredible where your broken arm took you. Your tutorials are very inspiring.Wish your arm is cured soon though!
ReplyDeleteHappy New Year!. Like the different variations of cubine, Especially like the Zendala. This is one of my favorite tangles also. Will have to think about what other tangles might be interesting to see.
ReplyDeleteThanks so much for this inspiration!
ReplyDeleteThank you for these posts! I'd also like to see: Tripoli, Between, Rain.
ReplyDeleteThank you. I would LOVE to see your study of:
ReplyDelete1. Bales,
2. Glacé, and
3. Tripoli.
Love these. Thank you for such a comprehensive examination of Cubine. Definitely going to revisit this tangle pattern :)
ReplyDeleteThank you for the many ways to enhance and manipulate Cubine. Have a blessed new year.
ReplyDeleteHappy New Year Margaret! Thank you for this fantastic tutorial. :)
ReplyDeleteFabulous tutorial! A real mental workout for the less creatively gifted of us. I always 'leave' feeling uplifted :)
ReplyDeleteOh wow, I would love to have a real Margaret tile! And I really love this post, I've always likes Cubine but now I have so much more possibilities to explore.
ReplyDeleteThe tangles I would like you to explore in another blogpost are: Tripoli, Prestwood and Betweed.
Wow. Love Cubine tutorial and plan to print it off to save for use with my classes as well as personal exploring. Ain't it amazon' all the varieties!
ReplyDeleteThanks for this. Are going to try this now. Happy new year.
ReplyDeleteI always no that some good stuff follows "...and then some".
ReplyDeleteHappy New Year!
Thank you very much for sharing Margaret - I am a big fan of your work. Perhaps you could tackle shattuck or Ixorus ? I would love to see some of your variations for these. 😃
ReplyDeleteMargaret…Happy New Year!! This is an amazing tutorial…it does make my head spin a bit!! But it gives me courage to play around with Cubine, which has not been a favorite! I think I will be back to this entry often--thank you!
ReplyDeleteAbsolutely wonderful and very inspiring tutorial! Thank you very much for sharing!
ReplyDeleteA happy new year to you!
Thank you for the in-depth tutorial! Inspiring as you always are. N'zeppel might be an interesting "and then some" subject.
ReplyDeleteMargaret, your tutorials are always the best! Thanks!
ReplyDeleteYour tutorials are awesome! Printed and in my notebook - always, I would be happy with any of your work if I win.
ReplyDeleteI really like your work, you give me a push to see what I can do with a tangle. I'm working on fengle right now and would love to see your version.
ReplyDeleteThis tutorial is amazing. Thanks for sharing your talent and ideas. I remember our time together fondly and often think about how my work has changed from your teaching. Thanks. don't include me in the give away.
ReplyDeleteLove the variations! Makes me want to do a study of every tangle just to see what I can come up with. Great Inspiration. I really like #6
ReplyDeletethanks
I have utilized the CUBINE tangle before, but never thought of it along all the angles you discussed here. I did the close up to distant concept, doing a "window", or "framed window panes". The curved CUBINE options adds new tangles to my bag of possible tangles. They do not seam like they souls be the same tangle name. Thank you for the education today.
ReplyDeleteMargaret, you have made a sensational super star start to 2015...thanks!!
ReplyDeleteThis is an amazing tutorial!! WOW thank you!! ~ Diane
ReplyDeleteThis would be my fav to win :) "Cubine with added 'fronts', with curvy lines, and windows on
the stars, plus a free-floating Cubine: a hole through
the white space - what fun!"
Just discovering that there's a name for what I do - so exciting, since I was feeling a little stuck :) Great tutorial, wow!
ReplyDeleteThe hints for a curved Cubine are fantastic and so is the addition of 'fronts' Thanks for this in-depth tutorial! I'm going now to find any others you have (hopefully) completed.
ReplyDeleteInteresting posting...
ReplyDeleteI'm fairly new and this tangle has fascinated me since I saw it the first time. Thank you so much for all of your work. And here I'm enjoying it many years later (2021) Isn't the computer great!
ReplyDeleteHi Nancy! It's fun to explore any tangle; there are so many variations possible even with ridiculously simple patterns. Have fun!
Delete